MOPEKS® FAQ - General
If the following does not solve your problem then please send an Email
1. What is Genetic Programming?
2. How does MOPEKS relate to Self Modifying Code?
3. How does MOPEKS relate to Core Wars?
4. How does MOPEKS relate to Object Oriented Programming?
5. What is the Folder and File Structure?
6. Please explain File Extensions and File Associations
7. What are Property Associations?
8. How can I turn MOPEKS BMPs into an Animated Gif or Movie?
9. Can I Step Through an Animated gif?
10. What are the Virtual Entities for?
11. Are you going to add Advertising to this site or MOPEKS?
12. Hints on Objects please!
13. Hints on Properties please!
14. Hints on Environments please!
15. How do I Set Colours?
16. Not in use
16. Not in use
1. What is Genetic Programming?
Genetic Programming ("GP") is a well established technique which creates a pool of computer programs which breed with each other subject to mutation and whose offspring survive or perish according to some criteria.
So, for example, if you wished to create a small computer program that finds the square root of a number you start with a pool of purely random programs and compare their output with the correct answer. Each program is then awarded a score and may or may not go into the breeding pool depending on how well it performs.
So gradually the quality of programs in the pool improves until eventually you arrive at a computer program that does the job. This is an example program as discussed in 'FAQ ⇨ Methods ⇨ Q1'.
double _stdcall SquareRoots(double R){
// Problem Description: '01 Square Roots'
// Generated by MOPEKS at 11.55 pm on Saturday 13th April 2013
// Initialise variables at zero
double ax = 0;
double bx = 0;
double cx = 0;
double dx = 0;
Line1: ax = R + 3;
Line2: cx = R / ax;
Line3: ax = ax + cx;
Line4: ax = ax / 2;
Line5: if(ax < R / cx)goto line2;
out: return ax;
}
If you wish to know more, this article in Wikipedia is probably a good place to start.
2. How does MOPEKS relate to Self Modifying code?
It is possible to write a computer program that modifies its own instructions. This may happen in a number of different ways and to achieve different purposes. If you want to know more about this you could start with this article in Wikipedia.
You will note the reference to "creating an entire program dynamically and then executing it". This, of course, is what MOPEKS does, albeit MOPEKS creates programs that are in a totally different language to the parent program.
As with Core Wars (#03 below), there are hints here of Genetic programming which, as explained in #01 above, is the underpinning of MOPEKS.
So, MOPEKS does show some of the characteristics of Self Modifying code.
3. How does MOPEKS relate to Core Wars?
The tradition of "messing about" with computers goes right back to the very early days of computing. The idea that the Core (or Random Access Memory as we would now term it) could be regarded as a battlefield on which programs fight for supremacy was one of the very first fun concepts to be explored.
The program Core Wars was evidently released in 1984 but a 2012 edition of Wired Magazine in the UK referred to a similar program dating to the 1940's. Unfortunately I cannot find the reference and Wired were unhelpful on the subject. If you find it, please email it to me.
As with Self Modifying Code (#02 above), there are hints here of Genetic programming which, as explained in #01 above, is the underpinning of MOPEKS.
4. How does MOPEKS relate to Object Oriented Programming?
Object Oriented Programming ('OOP') is a computer programming technique in which objects (eg 'a bank account' or 'a horse') have Properties (eg 'height' and 'width') and Methods (eg 'run' or 'close') that allow them to interact. Key aspects of OOP are Inheritance, Polymorphism and Encapsulation.
MOPEKS takes this process one step further by giving the user (as opposed to the programmer) control over all of these MOPEs (Methods Objects Properties and Environments). Indeed, it could be claimed that MOPEKS is actually an extremely high level programming language - one in which the user can construct problem solving entities.
Otherwise known as computer programs.
[Note: If you are familiar with OOP, you may have noticed that MOPEKS does (more or less) exhibit the characteristics of Inheritance, Polymorphism and Encapsulation. This is not deliberate. It just seemed to happen as a necessary part of making MOPEKS work. Indeed it was only when I started writing this section that I even realised that they were there as an intrinsic part of the design.
Actually, the word 'design' is inappropriate. A project such as MOPEKS is a very evolutionary thing in itself - inching forward over many, many years but mainly going round in circles. The end product may (probably not) look like it was 'designed' but the process whereby it was produced was anything but 'Intelligent Design'.
You will see evolutionary remains in various places in MOPEKS - I know they are there but removing them is risky and they do no harm.
Polymorphism is exhibited by the fact that a line in a Method will be interpreted differently depending on the Class of the Method it is contained in. It is needed so that you can regard a Method as a 'black box' and attach it to anything and it will still work - it is a solution to an interface problem between Methods and Objects.
Inheritance is exhibited during the 'Copy' process in the Library - you can use this to create a new Object or Environment which will exhibit all of the features of the original Object or Environment.
Encapsulation is exhibited by the fact that an Environment is self-contained and contains all of the Objects, Properties and Methods which are required. Further, the Properties of each Object can have different values particular to that Environment.]
5. What is the Folder and File Structure?
When you install MOPEKS it will add a large number of files to your C: drive under the master folder, MOPEKS. The basic structure is as below.

Left click on image for a full size shot in a new tab or window. Press F11 for a full screen, if you wish. Then F11 again to return
The two main folders, namely Factory and Library in turn contain a great many other folders. These may vary slightly but the basic structure should remain as below.
You can scroll up and down to see the files in a typical installation.

Left click on image for a full size shot in a new tab or window. Press F11 for a full screen, if you wish. Then F11 again to return
This would be a good time to look at these folders and files by using File Explorer (previously known as Microsoft Windows Explorer) or whatever program you use for exploring the folder and file structure of your PC. Personally, I use ACDSee which is free and much quicker and more versatile than File Explorer.
When MOPEKS starts up, it ensures that there is a folder for every Environment listed in the Library. In turn each such folders has sub-folders - see example edged in brown above. It also ensures that all of the following folders are present. If you have deleted a folder or changed its name, it will add the original back in.
C:\MOPEKS\Error Log
C:\MOPEKS\Factory\
C:\MOPEKS\Factory\Archives\
C:\MOPEKS\Factory\Methods\
C:\MOPEKS\Factory\Methods\Pool\
C:\MOPEKS\Factory\Methods\Pool\History\
C:\MOPEKS\Factory\Methods\Pool\Interesting\
C:\MOPEKS\Factory\Methods\Pool\Used in Library\
C:\MOPEKS\Factory\Methods\Progress\
C:\MOPEKS\Factory\Methods\Progress\History\
C:\MOPEKS\Factory\Methods\Progress\Interesting\
C:\MOPEKS\Factory\Methods\Progress\Used in Library\
C:\MOPEKS\Factory\Methods\Success\
C:\MOPEKS\Factory\Methods\Success\History\
C:\MOPEKS\Factory\Methods\Success\Interesting\
C:\MOPEKS\Factory\Methods\Success\Used in Library\
C:\MOPEKS\Factory\Methods\Success Summary\
C:\MOPEKS\Factory\Methods\Success Summary\History\
C:\MOPEKS\Factory\Methods\Success Summary\Interesting\
C:\MOPEKS\Factory\Methods\Success Summary\Used in Library\
C:\MOPEKS\Factory\Movies\
C:\MOPEKS\Factory\Movies\History\
C:\MOPEKS\Factory\Movies\History\Folder 01\
C:\MOPEKS\Factory\Movies\History\Folder 02\
C:\MOPEKS\Factory\Movies\History\Folder 03\
C:\MOPEKS\Factory\Movies\History\Folder 04\
C:\MOPEKS\Factory\Movies\History\Folder 05\
C:\MOPEKS\Factory\Movies\Interesting\Folder 01\
C:\MOPEKS\Factory\Movies\Interesting\Folder 02\
C:\MOPEKS\Factory\Movies\Interesting\Folder 03\
C:\MOPEKS\Factory\Movies\Interesting\Folder 04\
C:\MOPEKS\Factory\Movies\Interesting\Folder 05\
C:\MOPEKS\Factory\Scripts\
C:\MOPEKS\Factory\Scripts\History\
C:\MOPEKS\Factory\Scripts\Interesting\Class 01\
C:\MOPEKS\Factory\Scripts\Interesting\Class 02\
C:\MOPEKS\Factory\Scripts\Interesting\Class 03\
C:\MOPEKS\Factory\Scripts\Interesting\Class 11\
C:\MOPEKS\Factory\Scripts\Interesting\Class 12\
C:\MOPEKS\Factory\Scripts\Interesting\Class 13\
C:\MOPEKS\Factory\Scripts\Interesting\Class 14\
C:\MOPEKS\Factory\Scripts\Interesting\Class 21\
C:\MOPEKS\Factory\Scripts\Interesting\Class 22\
C:\MOPEKS\Factory\Scripts\Interesting\Class 23\
C:\MOPEKS\Factory\Scripts\Interesting\Class 24\
C:\MOPEKS\Factory\Scripts\Interesting\Class 34\
C:\MOPEKS\Factory\Trials\
C:\MOPEKS\Library\
C:\MOPEKS\Library\Archives\
C:\MOPEKS\Library\Environments\
C:\MOPEKS\Library\Methods\
C:\MOPEKS\Library\Objects\
C:\MOPEKS\Library\Problems Standard\
C:\MOPEKS\Library\Problems Standard\Class 1\
C:\MOPEKS\Library\Problems Standard\Class 2\
C:\MOPEKS\Library\Problems Standard\Class 3\
C:\MOPEKS\Library\Problems User\
C:\MOPEKS\Library\Problems User\Class 1\
C:\MOPEKS\Library\Problems User\Class 2\
C:\MOPEKS\Library\Problems User\Class 3\
C:\MOPEKS\Library\Properties\
C:\MOPEKS\Tools\
It is not a good idea to mess with these folders and the files within them until you are very confident that you know what you are doing!
6. Please explain File Extensions and File Associations
File Extensions General
In a Windows Operating System, files normally have a three digit extension eg MyFile.rtf, in this case the extension is 'rtf' and signifies that it is a Rich Text File.
For some reason, later versions of Windows tend to hide file extensions unless you specifically ask that they be shown. In my opinion this is a serious mistake as it opens the way to confusion and viruses - it is difficult to know exactly what you have just clicked on without the extension showing.
This article should enable you to show your file extensions. If that does not work, try this:
Start ⇨ My Computer ⇨ Tools ⇨ Folder Options ⇨ View ⇨ Un-check 'Hide Extensions for known File Types'
If you are still struggling, do a search for 'Show File Extensions' on your particular version of Windows.
File Associations General
If you wish, you can delve into Window and associate a particular file extension with a particular program. So, if you had obtained or written a particular image display program you can ensure that any file with the extension of, say 'jpg' or 'jpeg' is opened with that particular program when you click on the file concerned.
MOPEKS File Extensions
Although a three digit file extension is normal, there is nothing to stop you having more and MOPEKS actually uses four digit extensions eg 'myfile.mpkt'. There are four such extensions, all of which have been registered with FileInfo.com, the Central File Extensions Registry.
MOPEKS File Associations
When you start MOPEKS after downloading it for the first time, you will be asked if you wish to make the following File Associations:
1. Extension '.mpkt' - handles Trials
2. Extension '.msct' - handles Scripts
3. Extension '.mtxt' - handles Text Files
4. Extension '.mthd' - handles Methods
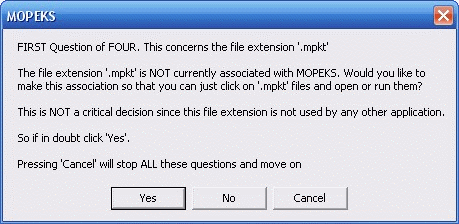
Left click on image for a full size shot in a new tab or window. Press F11 for a full screen, if you wish. Then F11 again to return
If you decline one or more of these extensions, then on the next two occasions that you start MOPEKS you will again be given the opportunity to make the File Associations that you declined but you will not then be asked again.
If in the future you decide that you are now happy to make these File Associations that you declined, you can go into the Office and press the 'Set to Three' button. Then when you re-start MOPEKS you will be given three more opportunities to make these Associations. This is explained in the animated screen shots below:
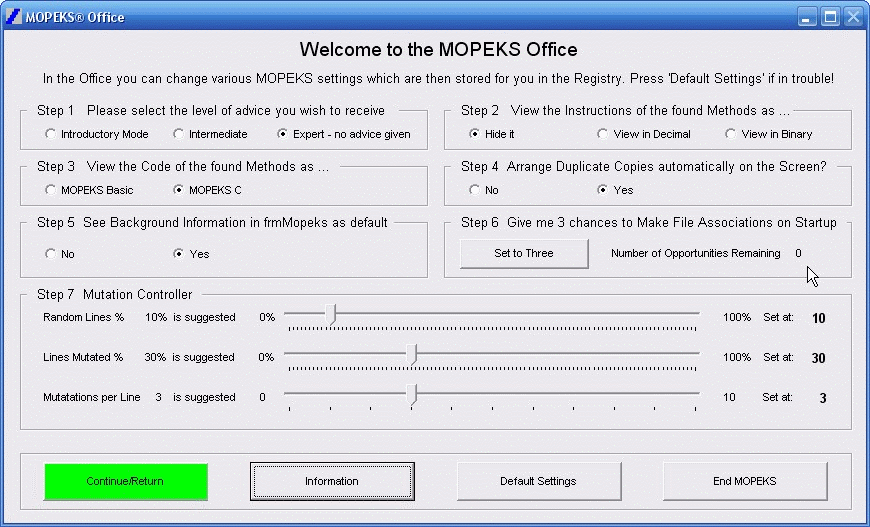 Left click for ANIMATED gif. Then Save Image to Disk and Step through as a Movie if you wish - see 'FAQ ⇨ General ⇨ Q9'
You can also use the 'Downloads ⇨ MOPEKS Tools' to make or remove these File Associations if you wish.
When you actually click on a file with one of these MOPEKS extensions you will see something like this:
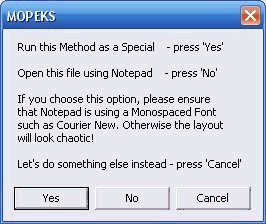
Left click on image for a full size shot in a new tab or window. Press F11 for a full screen, if you wish. Then F11 again to return
7. What are Property Associations?
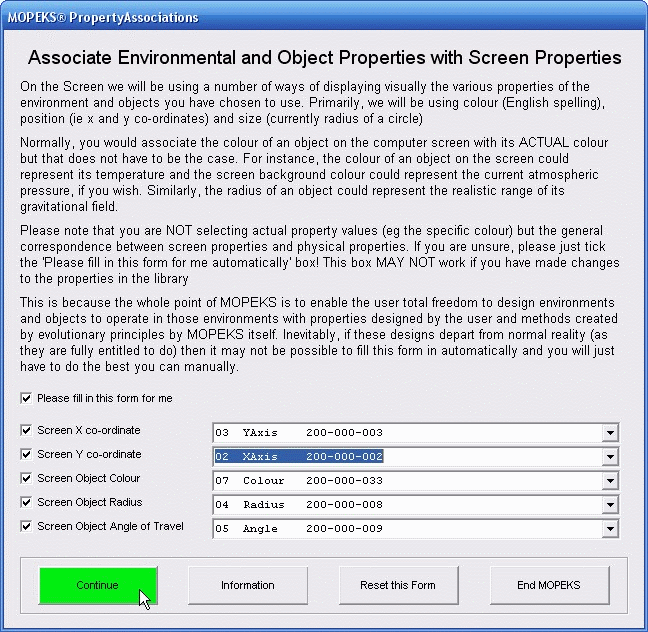
If you open MOPEKS, go to the Stores and try to view a Dynamic Trial in the Solar System, you will be confronted by the Property Associations form as in the screen shot below.
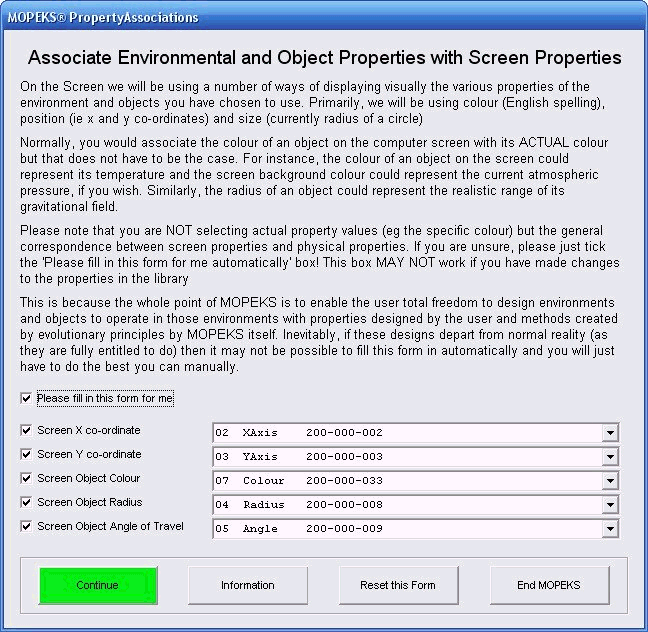
Left click on image for a full size shot in a new tab or window. Press F11 for a full screen, if you wish. Then F11 again to return
Now, try reversing the X and Y axis associations as in the screen shot below.
Left click on image for a full size shot in a new tab or window. Press F11 for a full screen, if you wish. Then F11 again to return
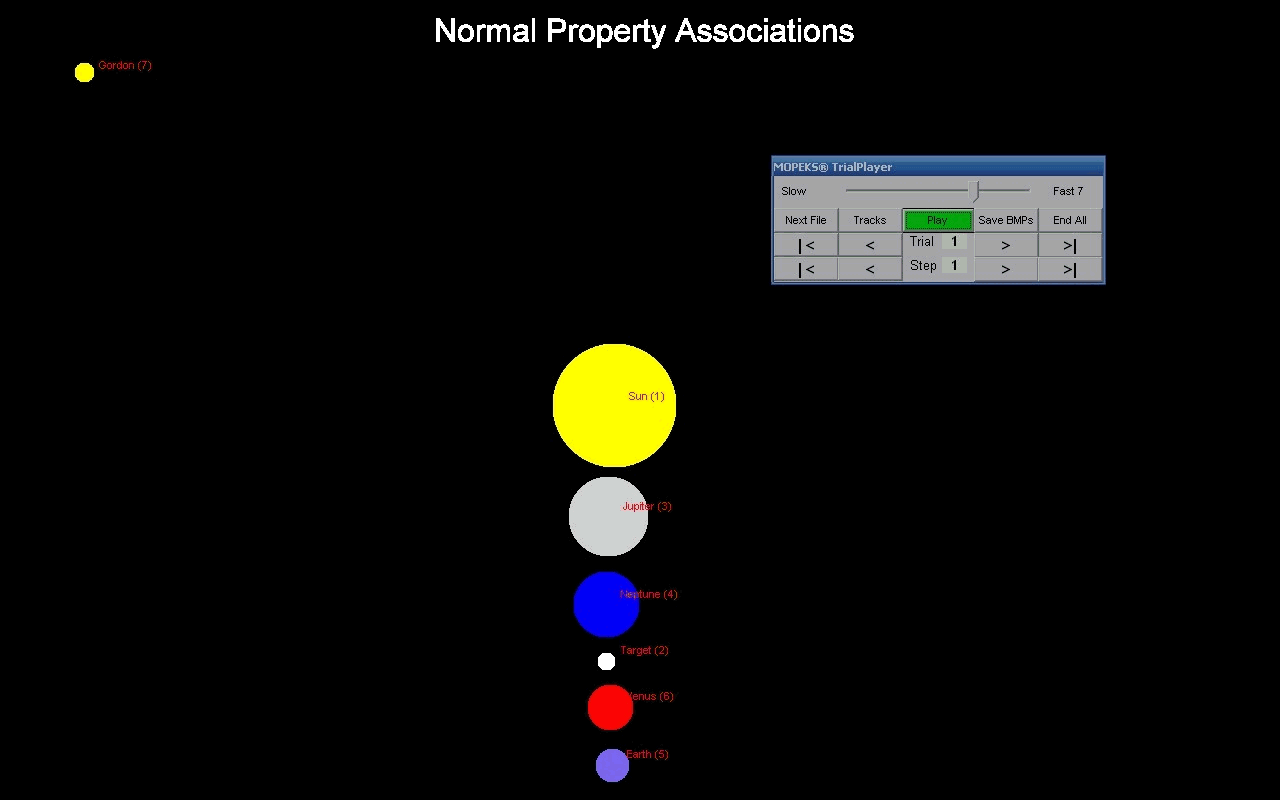
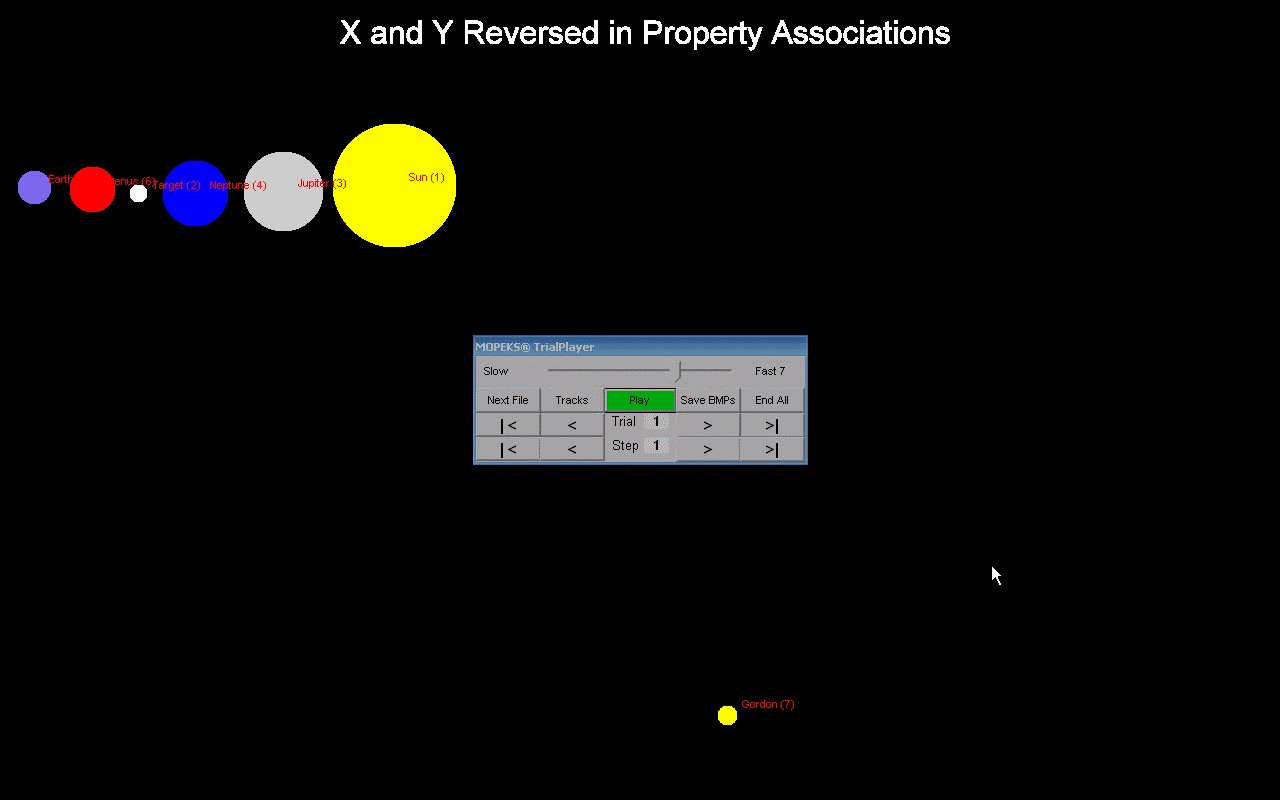
Note how everything is reversed in the two screen shots below. You can left click on the images to see the animation.
 Left click for ANIMATED gif. Then Save Image to Disk and Step through as a Movie if you wish - see 'FAQ ⇨ General ⇨ Q9'
 Left click for ANIMATED gif. Then Save Image to Disk and Step through as a Movie if you wish - see 'FAQ ⇨ General ⇨ Q9'
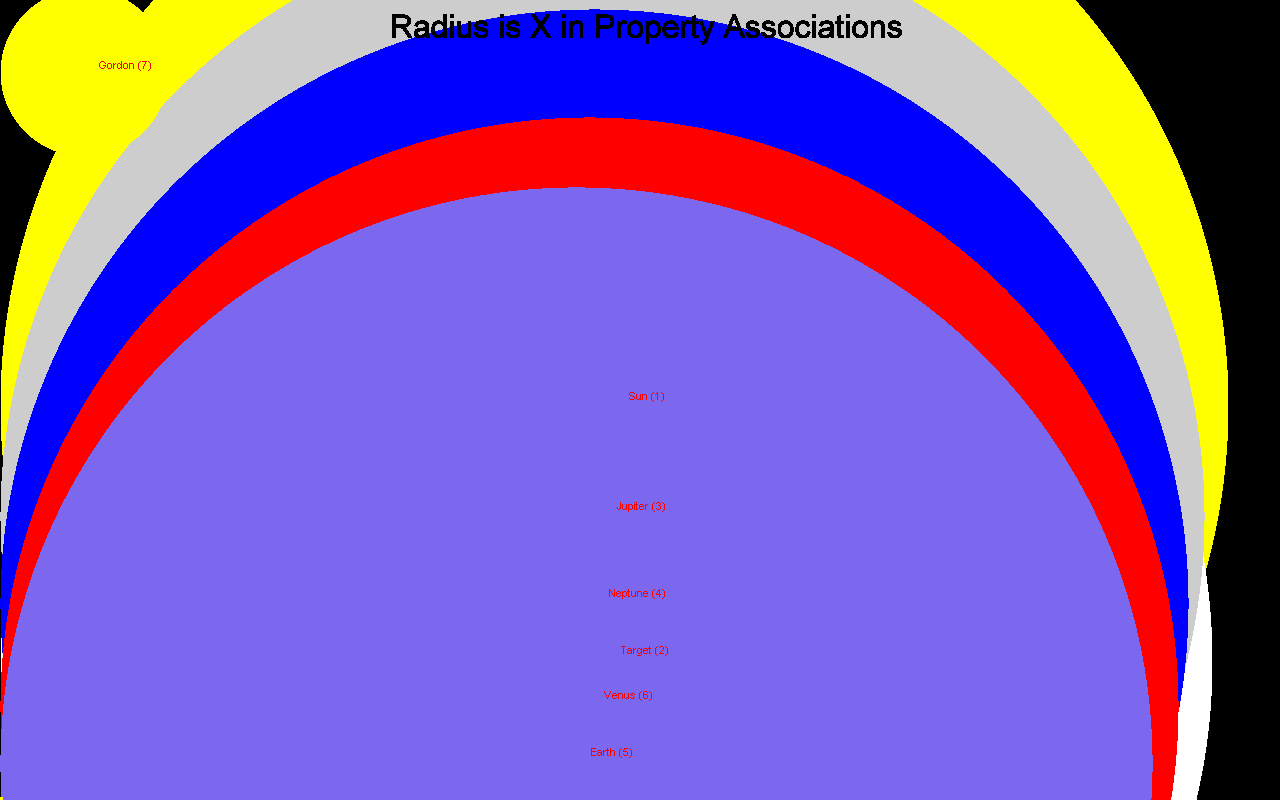
If you set the Radius as the X axis in Property Associations this is what you get.
 Left click for ANIMATED gif. Then Save Image to Disk and Step through as a Movie if you wish - see 'FAQ ⇨ General ⇨ Q9'
8. How can I turn MOPEKS BMPs into an Animated Gif or Movie?
If you look in 'Guide ⇨ Stores ⇨ View Dynamic Trials/View Simulations' you will notice that you can turn a stored Dynamic Trial or Simulation into a series of Bitmaps.
The only way I have found to turn the BMPs into an animated gif is by buying (I know) the excellent commercial product 'Ulead GIF Animator'. Note that many gifs are not animated - really gif is just a format but it has been abbreviated in popular usage to be an animated display. Rather in the way that many people think that a 'Forensic Expert' is a 'Scientific Crime Investigator'. He isn't - he's a lawyer.
As for turning BMPs into movies there are dozens of free products that can do this but I think that to do it properly in one go you probably need a commercial video editor. Which one I have no idea. See Q9 below.
9. Can I Step Through an Animated gif?
Yes, but first a detour.
I appreciate that instead of using animated gifs I could have just created movie files. I did, in fact, attempt to do that but the results were not good for the following reasons:
1. The files were very large - 2 megabytes and upwards.
2. The conversion seemed to lose an enormous amount of definition ie the movie was fuzzy
3. Because some of the screen shots are non-standard sizes the result was distorted spatially ie stretched or compressed
If you know how to get round these problems please send me an email. See 'Contact' above.
Hence the decision to use animated gifs. The files are very small, the definition is perfect and the non-standard size is not an issue. The one drawback is that you cannot easily step through them - I know you can stop and restart them using various browser tricks but it is not easy to do and only works on some browsers.
If you are a programmer and need a project, this is a good one for you - controllable animated gifs.
All is not lost however. You can actually save an animated gif to disk and then play it as a movie and start and stop it at will. Here's how:
1. When the animated gif is playing on your screen, right click on your mouse and save the image to somewhere convenient on your disk
2. Start Window Media Player - it usually lives in "C:\Program Files\Windows Media Player\wmplayer.exe" if you cannot find it
3. Right click on the black title bar right at the top of the screen
4. Select 'File'
5. Select 'Open'
6. Select 'Any File (*.*)' at the bottom of the drop down list from 'Files of Type'
7. Select and Open the animated gif you have just saved.
8. Play it in stops and starts if you wish
Here is an animated gif showing you how to do it. Admit it, you did just smile, then. You will need to press 'F11' to have a full screen so that you can see what is going on.
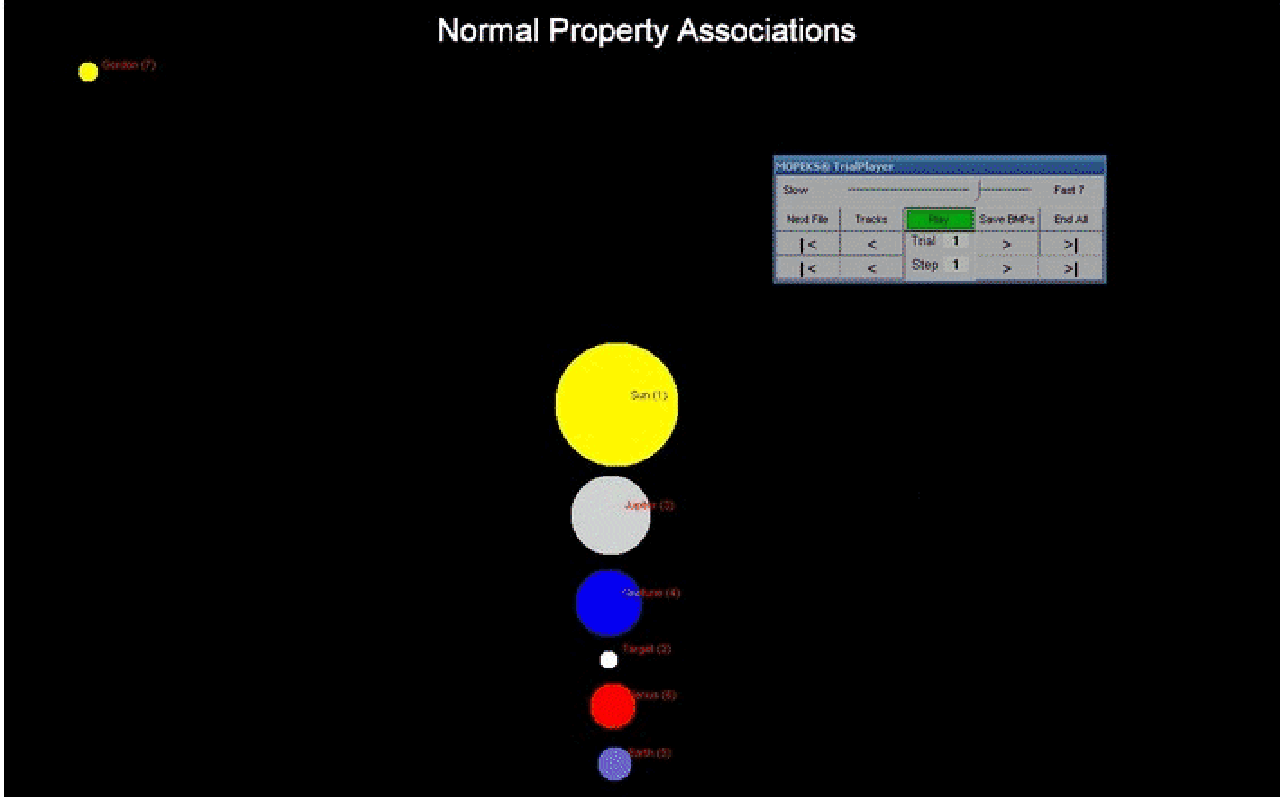 Left click for ANIMATED gif. Then Save Image to Disk and Step through as a Movie if you wish - see 'FAQ ⇨ General ⇨ Q9'
10. What are the Virtual Entities for?
If you create a new Environment in the Library, (see 'Guide ⇨ Library ⇨ Create') you will notice that it adds in Virtual Object 2, Virtual Property 2 and Constant.
You may also notice that some Objects contain a Virtual Property. These virtual entities are present merely because the database control used (MSHFlexGrid) cannot contain nothing - it must have at least one row.
So, you can delete these virtual entities if you wish after you have added some real ones!
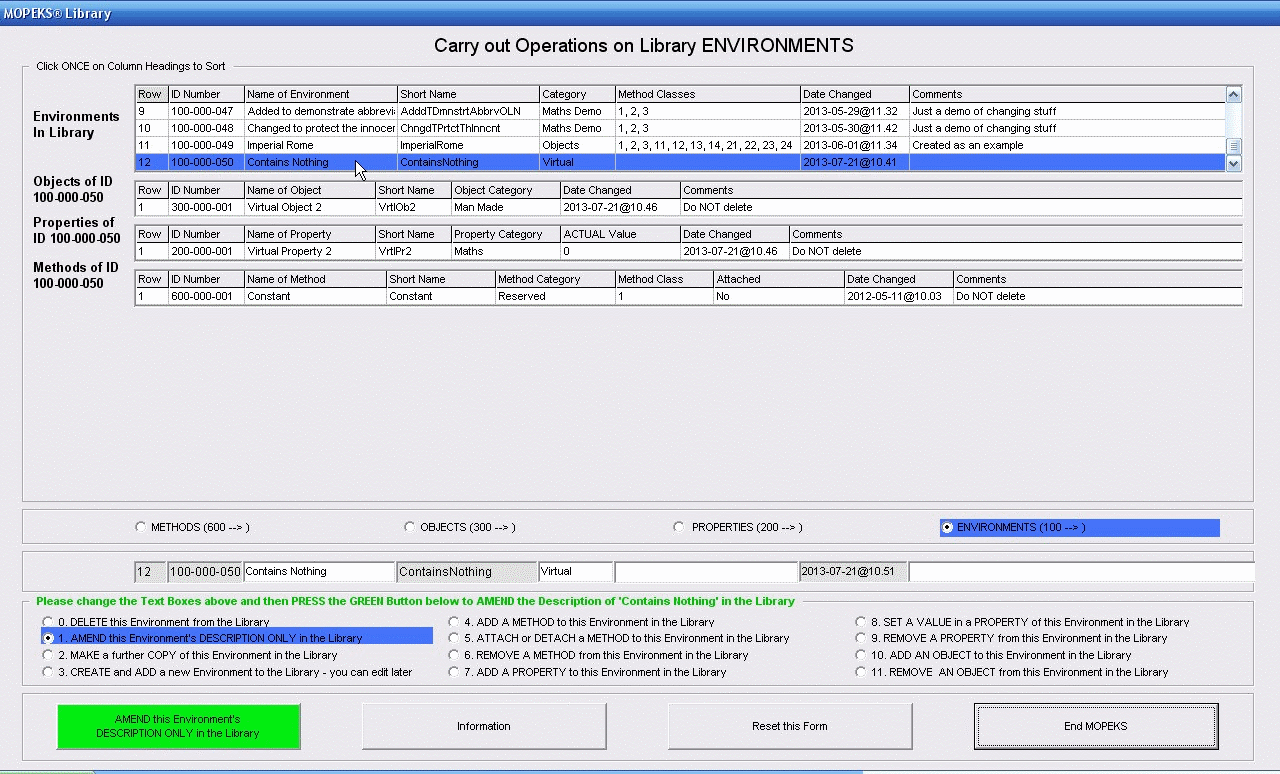 Left click on image for a full size shot in a new tab or window. Press F11 for a full screen, if you wish. Then F11 again to return
11. Are you going to add Advertising to this site or MOPEKS?
No. Never. Not under any circumstances.
12. Hints on Objects please!
Beginners
When you create an Object in the Library (see 'Guide ⇨ Library ⇨ Create'), you should ensure that it has the following Properties as a minimum - see 'Guide ⇨ Library ⇨ Add Property':
200-000-002 XAxis
200-000-003 YAxis
200-000-033 Colour
200-000-008 Radius
200-000-009 Angle
This is so that MOPEKS can show these Objects on the Screen in an Environment and can make Property Associations - see
'FAQ ⇨ General ⇨ #07'
Advanced
Once you have got used to MOPEKS you can become a little more adventurous, if you wish. Rather than just create an Object which has the standard 5 properties just listed above, you can create an Object with 5 properties that can be mapped across to them. For example, the 5 properties could be as follows:
200-000-071 Year
200-000-072 Pressure
200-000-073 Density
200-000-074 Reach
200-000-075 Direction
This is so that MOPEKS can show these Objects on the Screen in an Environment and can make Property Associations - see 'FAQ ⇨ General ⇨ #07'
This is what the Property Associations Form might look like:
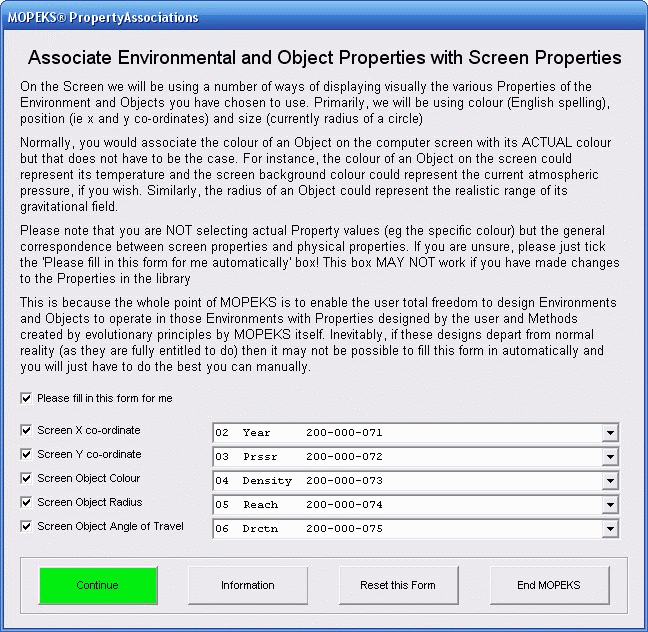
Left click on image for a full size shot in a new tab or window. Press F11 for a full screen, if you wish. Then F11 again to return
Here is the actual data in a Static Trial ...
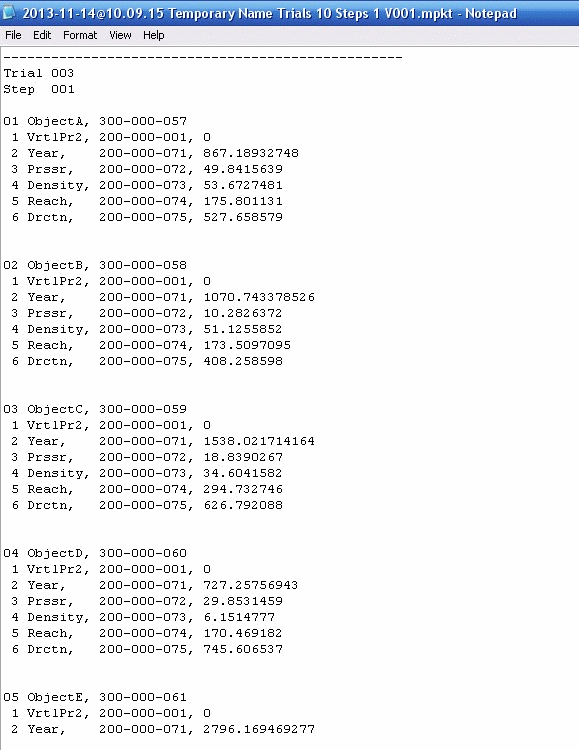
Left click on image for a full size shot in a new tab or window. Press F11 for a full screen, if you wish. Then F11 again to return
... and here is what it looks like visually
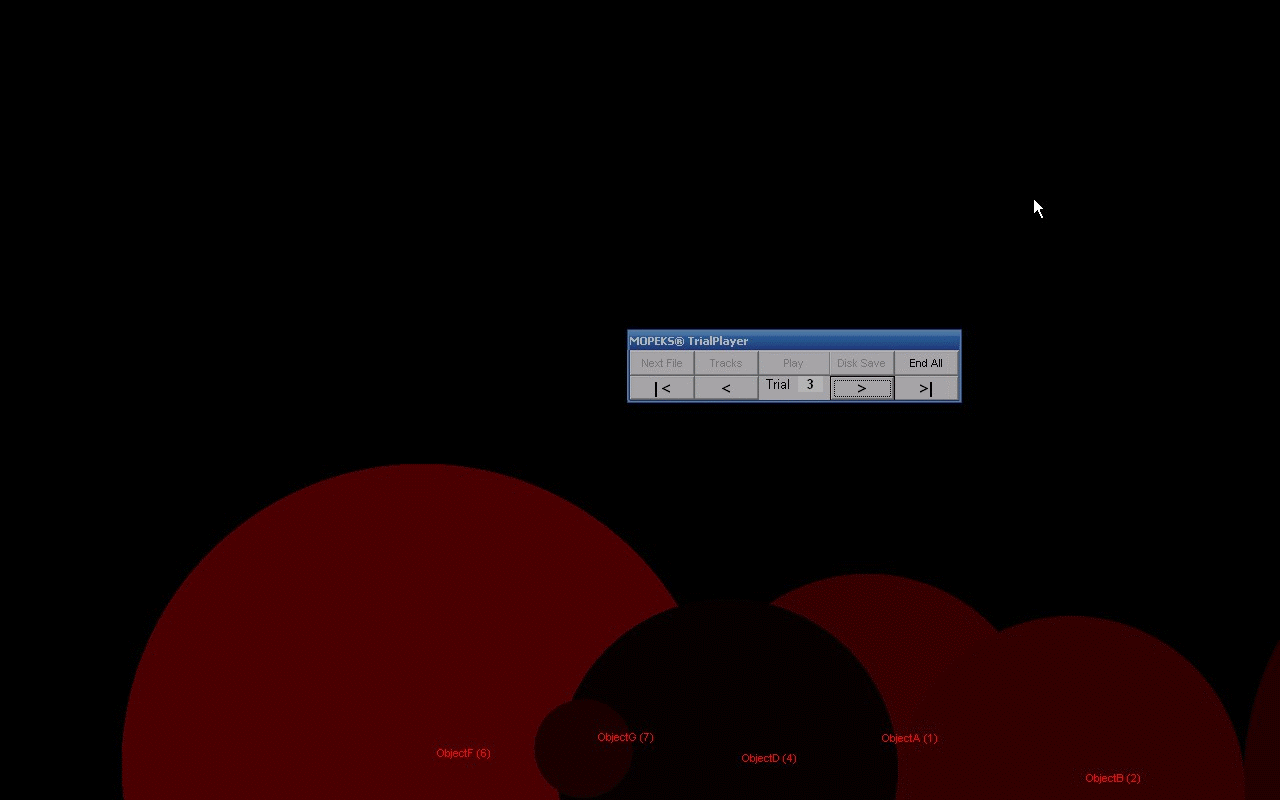 Left click on image for a full size shot in a new tab or window. Press F11 for a full screen, if you wish. Then F11 again to return
13. Hints on Properties please!
There are currently no hints on Properties ...
14. Hints on Environments please!
Hint 1
When you create an Environment in the Library (see 'Guide ⇨ Library ⇨ Create'), you should ensure that it has the correct Classes present as comma separated values, as in the screen shot below:
 Left click on image for a full size shot in a new tab or window. Press F11 for a full screen, if you wish. Then F11 again to return
Otherwise, if you try to use it in an Object oriented situation (eg to Create Static or Dynamic Trials) you will find that the environment concerned has disappeared! The first time this happened to me I thought it was a programming error ...
15. How do I Set Colours?
Colour in an Object
When you create an Object in the Library, as a practical matter you should ensure that it has the Colour Property. This is covered at greater length in 'FAQ ⇨ General ⇨ Q12'
The mathematics of colour values is covered in the next paragraph.
Colours in an Environment
When you create an Environment in the Library (see 'Guide ⇨ Library ⇨ Create'), as a practical matter you should ensure that it has the following two Properties - see 'Guide ⇨ Library ⇨ Add Property':
200-000-058 Colour Back This is the actual Background Colour of the Environment
200-000-059 Colour Fore This is the Colour of the Lettering on each Object in the Environment
Once your new Environment has actually got these two Properties you can set their values - see 'Guide ⇨ Library ⇨ Set Property Value'
Unfortunately, Visual Basic 6 uses BBGGRR (BlueBlueGreenGreenRedRed) notation for colours but the values in the Library must be set in normal decimal values rather than hexadecimal. The following table should give you the idea:
| Colour | As Hexadecimal | As Decimal |
|---|---|---|
| Red | FF | 255 |
| Green | FF00 | 65280 |
| Blue | FF0000 | 16711680 |
| Yellow | FFFF | 65535 |
| Black | 000000 | 0 |
| White | FFFFFF | 16777215 |
So, if you create an environment with a green background and a white foreground, this is what a Static or Dynamic Trial will look like visually:
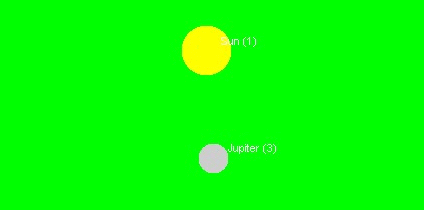
Left click on image for a full size shot in a new tab or window. Press F11 for a full screen, if you wish. Then F11 again to return
And this is what a Trial will look like when you open it with Notepad:
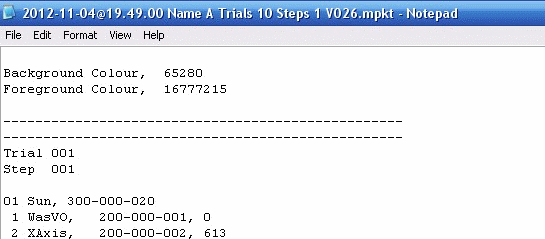
Left click on image for a full size shot in a new tab or window. Press F11 for a full screen, if you wish. Then F11 again to return
16. Not in Use
17. Not in Use
MOPEKS® and the Blue Logo are the Registered Trademarks of the MOPEKS Organisation
Website Published: 15th October 2013
Program Launched: 2nd November 2013
Copyright © MOPEKS Organisation 2013. All rights reserved
'MOPEKS Organisation' is the Trading name of Mopeks Ltd a company registered in England under number 07519676
The robot docking station is here
here